Showing posts with label M2. Show all posts

Tuesday, 1 February 2011

Flash Accessories

Having wrote a blog post on the different types of flash, it seems necessary to finish this subject with the accessories used with flash.

Reflectors

reflector

As some of the group will know, I often carry at least one small white reflector in a pocket in my camera bag, just in case I or others need it, it’s amazing what you can get on a magazine these days !
These can be used to reflect light to an area where the flash might not illuminate, to avoid shadows.

Reflectors are available in four colours: white; silver; gold and black.

White reflectors are used for reflecting diffused light towards the subject.

Silver reflectors are used to reflect brighter, more harsh light towards the subject.

Gold reflectors are used to reflect a bright and warmer light towards the subject.

Black reflectors, sometimes called 'French Flags', reflect shadows onto the subject. Although this one sounds odd, and completely the opposite to what a reflector is there for, but it works and can add a subtle shadow if necessary. 
 
 
Flash Triggers
pulsar

I mentioned briefly in my last post about flash triggers.  These units can trigger flash units (both small and studio) without the need for sync cables, for up to 100m.

Because some use radio transmission, rather than IR, it allows for triggering around corners, through walls and is not affected by high ambient light situations.

Flash triggers usually allow the photographer to choose from four individual channel and six studio selectors, each providing a unique ID for a different flash device or combine them to trigger all equipment within a given setup or studio.  This might sound an odd feature, but where other photographers may be near you it can prevent someone else’s trigger from setting off your flash.

This Pulsar flash trigger also features a hot-shoe mount, sync in and sync out terminals, a ready indicator, a test button and an external power option.

With these triggers each unit can be used as either a transmitter or receiver and is powered by just two AAA batteries, again not breaking the bank.

Photographic Flash

Personally, I prefer to use existing light as much as possible, hence the late additional of this posting.  But sometimes you have little alternative.

There are basically three types of flash:

  1. Built in Flash
  2. Accessory flash units / guns
  3. Studio Flash

Built In Flash

built in flash

The built in flash unit on a camera are very limited, usually with a guide number of about 10 – 13, at ISO 100.  Although not very powerful the main advantage is that these are always available, being built into the camera and can be very useful for fill in flash.


Accessory Flash Units / Guns


Flash Gun

These units offer far more power than built in flash units, and lots more options.

Above is one of my flash units, which has a bounce and pan head, which allows me to bounce the flash of ceilings and walls, which diffuses the light that illuminates the subject, although care has to be taken as sometimes the colour of the ceiling or wall, if a particularly strong colour, can leave a slight colour cast on the photograph.

My flash unit also has a zoom function that can concentrate the flash into the centre of the photograph, to match the focal length of you lens, or zoom setting, which is handy when you are limited how close to the subject that you can get.

Some flash units also have diffusers built in to the head to diffuse the light without having to bounce the light, removing the harsh flash that can sometimes ruin a photograph.

You may have noticed the Velcro pads on the side of the flash head, these were for a flash diffuser which fitted to the head of the flash unit, which was then angled up and the flash was bounced using this diffuser towards the subject.  Yes another of my gizmos !

Pocket Bouncer - flash modifyer

You can use these flash units either fitted on top of the camera, using the hot shoe adaptor, or off the camera on a tripod, controlled via slave sensor:

slave-adaptor

As shown above, or wireless / infra red trigger.  Also flash sync cables can be used, but care must be taken to prevent accidents from people tripping over, or even you pulling over the tripod, with its flash unit, if you walk off too far for the cable to reach.

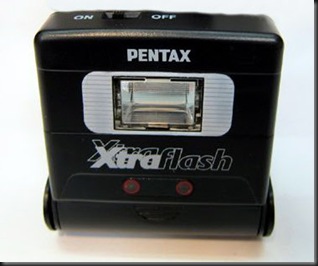
In fact I have three Pentax Xtra Flash units, which are small self contained slave / flash units which I got for £5.00 each.  They work off one AA battery, so they would hardly break the bank for consumables.  These units do take some getting used to, but are something that, if carried in your camera bag, could make the difference between a good photograph and a badly lit one.

Pentax Slave Flash

Looking today, they are not available from this shop anymore, and one price I did find for these units was £19.99 !

The power of a flash unit is shown as it’s guide number, which shows how far the flash would be useful, based on using ISO 100 sensitivity (or film) in meters.  But this distance does not take in to account the use of bounce flash, so you would have to consider this when deciding if to bounce the flash off a ceiling or wall.


Studio Flash

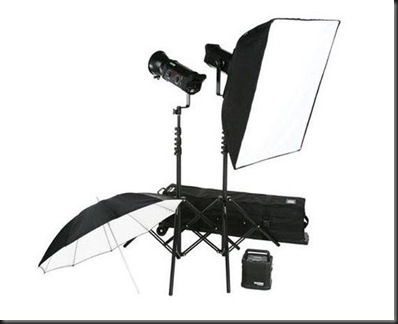
Studio flash 2

These are the big daddy of the photographic lighting world, and are rarely seen outside a photographic studio, due to their size and their power requirements, so when I had a chance, on my last photographic course, to use them I jumped at the opportunity.

The heads to these units, shown below, can be fitted with a number of flash modifiers, for example soft boxes (as shown above (right)), umbrellas (as shown above (left)), snoots and barn doors.  These are used to soften, diffuse, direct and control the light from the flash to the subject.

These units are usually triggered via wireless or infra red, or sync cables, but again care has to be taken to avoid accidents.

Sunday, 30 January 2011

ICC Profiles


After writing about colour management, printer (and monitor) calibration and printing the photographs, both theory and practice at Burton College and via D S Colour Labs, I thought I had better do a short blog on ICC Profiles.

The term ICC refers to the International Colour Consortium.

Understanding what a profile is will help you fully comprehend what happens in colour-managed transformations. An ICC profile is a standard way of numerically defining the way a particular device (a scanner, camera, printer or monitor) renders colour for a human observer under average daylight conditions. Colour management involves linking these various device profiles together in a way that allows us to control the appearance of colours from one device to another. In order for this to work, a profile must reference the observable colours from a device to a device-independent model, a sort of absolute definition of colour. Profiles are static definitions, and the dynamic calculations that move an image file through various profiles to arrive at the final output are handled by a colour management module (CMM) that’s the mathematical engine for all the transforms.

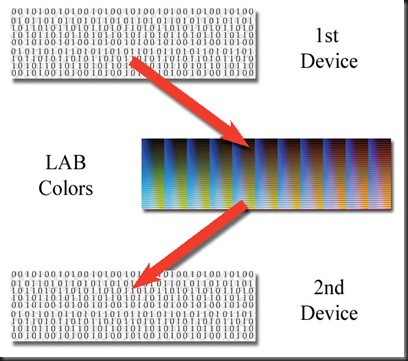
Therefore, a profile is a special number transformer, a kind of black box called a lookup table (LUT), or more often a colour lookup table (CLUT), which takes a set of numbers and returns another set of numbers. The first set of numbers can be from any kind of colour device (RGB, CMYK or grey scale); the second set of numbers is the LAB definition of the colour represented by the first set.

ICC profiles 1

The above might look confusing, but it is important to remember that all computers work on binary, and that even that picture you took on location or in Burton College’s studio, is seen by the computer as simply a series of 1s and 0s.

A profile “looks up” the LAB value for a colour in a specific colour space.

You can think of LAB numbers as being independent of any particular device but representative of colours observable under D50 graphics industry-standard lighting. Therefore, a profile gives us a real colour definition of the numbers from a digital file—in D50 light.

Some profiles are relatively simple rules based on a matrix with a few points defining a larger set of colours. Other profiles are larger plots of all possible colours in a particular set. Matrix profiles are commonly used for Photoshop’s working spaces and monitor profiles. Printer profiles are most commonly larger CLUTs, sometimes referred to as table-based profiles. The math surrounding all this is staggering. For the artist, a profile is merely a definition of the colour rendered by a device translated into LAB. When photographers need to transform one set of device numbers into numbers for another device, they use profiles to “look up” the LAB colours and generate new numbers for the next device based on those colours.

ICC profiles 2

LAB Colour is the link between the two device numbers.

When the profiles for the devices you’re using are installed, you simply have to select the appropriate profile at the right time to manage the necessary colour transforms.

Friday, 28 January 2011

Printer Calibration

The final element of the digital work flow, the printer, has to be calibrated to ensure that all you hard work, composition, capture, conversion / processing, etc, is not all in vain.
 
Photographs looking different when displayed as opposed when they are printed is not a new issue that has been created with the digital revolution.  Paul, my brother, used slide film for years because he liked how the colours were more vibrant and true to what he saw when he took the photograph, when they were shown on a slide projector,  in a similar way to how our images look on the screen, but when prints were taken off the slides the photographs lacked the vibrancy and punch that he saw when it was projected on to a screen, in the same way as our photographs lack these features when our photographs are printed out.
 
It is important to note thought that a calibration has to be carried out for each printer / ink / paper combination, so basically it is best to stick to one make of ink and one type (finish, weight and even manufacturer) of photographic quality paper.  Some papers are promoted as bright white in colour as opposed to just white.
 
Some photographic paper manufacturers, for example permajet, offer a service whereby the photographer buys a pack of their paper, they produce a print using their combination of printer / ink / with the manufacturer’s paper, and send this to the manufacturer who analyses the colours against the original image.  The manufacturer then sends a custom ICC profile for their paper when used with the photographer’s printer and ink.
 
The ICC profile for a printer is created by comparing a test print result using a photometer with the original reference file. The test chart contains known CMYK colours, whose offsets to their actual L*a*b colours scanned by the photometer are resulting in an ICC profile. Another possibility to ICC profile a printer is to use a calibrated scanner as the measuring device for the printed CMYK test chart instead of a photometer.
 
A number of manufacturers, like Huey, Eye-One, etc produce kits which can calibrate monitors and printers, using colour photometers, to maintain full colour management from the beginning of the workflow right through to the end print.
 
Some software, such as Adobe’s Photoshop has a soft proofing option that can be used to simulate on screen how the photograph will actually look on paper, colour and depth wise as opposed to a simple print preview, which just shows how the image would fit on the page.
 
Below is an example of how an image looked on the computer screen, and how it looked on the soft proofing simulation from Adobe Photoshop:

on screen and print simulation

This example shows how prints can lack the punch that on screen images have.
 
The problem is that no matter how ‘bright white’ you paper might be, it would never look as bright as a monitor screen.
 
 
Using ICC profiles
 
When you choose the print option from Adobe Photoshop, you will get this requester:
 
Print options

When the print dialog comes up, make sure you have Colour Management selected in the drop-down at the upper-right corner; most of the important printing options for our purposes are in this area (Figure 4). This is where you set up all the Profile options for your prints.

At the centre of the dialog, Position controls how the image lays out on the page. The Centre Image check box provides a quick way to place the image. Directly below that is the Scaled Print Size area; by default, this is set up for 100%. If the image is way too small or way too big on the page preview, click the Print Settings button and make sure you’re using the right-sized paper. Checking the Scale To Fit Media check box is a quick and dirty method of sizing the image to fit the paper; just beware that your quality will suffer if the reported Scale percentage is overly high. It’s far better to set the size properly in Photoshop before using the dialog. The Bounding Box check box is useful when you have an area of white canvas in your image—the bounding box shows the edges of the image against the white of the paper.
 
The important colour settings reside in the right third of the dialog box. The two radio buttons directly under the Colour Management drop-down identify whether you’re going to print the document directly or generate a simulation proof; if you’re making prints for your portfolio or to sell to a client, you’ll probably check Document because this generally will provide the highest-quality print for your image. This sets the profile to the document colour space and determines from where the colour starts in its journey to the print.
Next is the Colour Handling area. For RGB images, the Colour Handling drop-down shows Photoshop Manages Colours, Printer Manages Colours or Separations.
 
Photoshop Manages Colours. Selecting Photoshop Manages Colours allows you to select the Printer Profile in the drop-down menu just below this one. This is the most straightforward way to set up colour management for the print. If you select Photoshop Manages Colours, remember to turn off colour management in the printer dialog!
 
Printer Manages Colours. If you select Printer Manages Colours, the Print Profile option will be greyed out, and you’ll have to set the Colour Management options in the printer driver. The Printer Driver dialogs are usually a lot more confusing in this regard, so you would be wise to stick with Photoshop.
 
Separations. Separations will be available only if you’re printing from a CMYK document; otherwise, it will be greyed out. This is used only when printing separate cyan, magenta, yellow and black “plates” or simulations, and for the most part, you can ignore it.  This type of printing is only really for use with printing companies who use the traditional plates method of printing.  Below is a screen grab from PhotoPlus with the colour separations and Prepress options:
 
Printing separations

The last choice is Rendering Intent. Here you can choose: Perceptual, Saturation, Relative Colorimetric or Absolute Colorimetric. 90% of the time, Relative Colorimetric will give you the best result. Occasionally, certain very saturated colours will tend to posterize and lose detail in the print. If this is the case, you can try to solve the problem with Perceptual rendering.
 
Generally though, Perceptual rendering will give a less saturated colour in the print, and your skin tones could become dull. The other renderings are applicable for custom profiles and unusual circumstances; however, for the most part, you can ignore them with people images.
 
Beginning with Photoshop CS5, the large preview in the dialog is colour managed and has some check-box controls underneath the preview. Checking Match Print Colours, by default, checks the other two boxes you can uncheck them if you desire. Gamut Warning renders flat areas of grey over any colour that’s out of gamut for the selected printer profile. Show Paper White puts a tone into the white areas of the preview in an attempt to simulate the effect of the paper colour on the image (much as you can with the Custom Proof Setup under the View Menu). The preview also can be used to reposition the image directly. If you uncheck the Centre Image check box in the Position area, you can click the image preview and move it around on the page and/or rescale it by dragging on the corner handles in the bounding box (if you uncheck the Bounding Box, you won’t be able to do this).
 
Once all your options are set, you’re free to click Print. The only additional thing you need to remember is that if your colour management options are being set in Photoshop, you have to turn off any such options in the Printer Driver dialog. All of the colour transformations will have taken place already in Photoshop before the data hits the printer driver, so make sure you don’t “double colour manage” and introduce an additional transformation. Every printer driver is a little different, but yours will have some option to select no colour management in the printer driver.

Saturday, 15 January 2011

Architectural Photography Techniques

For this assignment I built (pun intended ;-)) ) on what I learnt during the landscape assignment involving using light, but this time I wanted to try to use the light to illuminate the buildings, or elements of them, in different ways.

This time I had to be careful when using wide angle lenses, to avoid parallax (or converging vertical) errors which have marred many architectural photographs.  By taking some architectural photographs from a distance using the 18 - 200 mm or 75 - 300 mm lenses, zooming in to remove distractions, and frame the building  vertically in the viewfinder, I could capture the whole of the building, but without any of the above problems.

Ideally, I would use a tilt and shift lens for this type of photography, like the one shown below:

These lenses enable the camera to capture tall buildings without angling the lens up towards the top of the building, causing the converging verticals distortion.

Below is an example of using both normal and tilt and shift lenses:


But these lenses are very expensive, and have limited uses, so unless I wanted to specialise in this photography I would have to photograph buildings from a distance, or correct the images later in the post production stage.

Monday, 6 December 2010

Heather Angel

Heather is an award-winning photographer who has been at the forefront of nature photography in Britain for three decades.
 
Born Heather Hazel Le Rougetel on 21 July 1941.
 
Her love of the natural world began during her childhood summer holidays spent on her maternal grandparents' Suffolk farm. It was therefore a natural progression for her to study zoology at University; but at that time she had no ambition to be a photographer.
 
Heather graduated from Bristol University, in 1962, and then took part in a 3-month underwater expedition to Norway – she was the only woman amongst eight men. Here, she took her first pictures – all of marine life – with an Exakta camera, which her father gave her as a 21st birthday present.
 
A period of marine biological research followed when Heather began to write articles on marine life in her spare time. In 1965 Heather worked as part-time assistant plankton sorter at the National Institute of Oceanography.

Gradually, photography began to impinge on the marine biology and some years later she turned freelance. So began a peripatetic life travelling repeatedly from the poles to the tropics in her quest for arresting wildlife photographs.
 
In 1966 she became an Associate of the Royal Photographic Society, followed in 1971 when she became a Fellow of the Royal Photographic Society
 
Her work has been recognised by world-wide honours and awards. In 1986, an Honorary Doctorate of Science was conferred on her by Bath University. When Nottingham University appointed her a Special Professor in 1994, she was the first British wildlife photographer to be so honoured. Four years later, the BioCommunications Association of USA made her their 1998 Louis Schmidt Laureate. From 1984-86 Heather Angel was President of the Royal Photographic Society; only the second lady President within the Society’s 152-year history. In 2000, Practical Photography described her as ‘the doyenne of nature photography’.

To date, she has produced 47 books to date.
 
Some examples of Heather's macro photography are shown below:
 
Crustose-lichens-growing--015 Silver-birch-016
Maple Leaf in Fall
Pond Cameo Fern Crosier
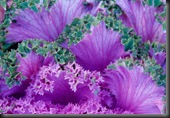
Ornamental Cabbage
Dichotomously-branched-li-001
 
Analysis of Images
 
Heather has used the lens to capture the texture of the plants that she has photographed, with a large aperture to isolate the subject from it’s surroundings, with the exception of the Pond Cameo (row 3, column 1) where she has kept the leaf in sharp focus.
 
The photographs have vibrant colours and the elements in the photograph form interesting shapes.

Wednesday, 17 November 2010

Printer Problems - Inkjet Printers

One thing about printing your work at home is that you have been in full control of the whole process from choosing your position and taking the photograph to seeing your print emerge from the printer. With this control though comes a few drawbacks including hardware and software issues.

As inkjet printers are the most common printers used at home for printing, I will cover this type of printer.
 

Most inkjet printers have a built-in diagnostics program to help you troubleshoot. Typically, running a test page involves pressing a button or two as you turn on the printer. Many inkjet printers also use a combination of indicator lights to help you pinpoint the problem.
 
Below are some of the problems that you could encounter at the printing stage:


Prints are lighter than expected or prints contain white spots or horizontal lines.

These signs point to a clogged print head - especially if you haven’t used your inkjet printer for some time. Banding (fine horizontal lines across the print are a common problem, sometimes encountered after changing a print cartridge.

Below is an example of banding:


To solve these problems select the printers cleaning and diagnostic utilities application for your printer, this is installed when you install your printer:
 
Below is the utilities screen for my Epson Stylus Colour 860:
 
Epson Ptr maintenance 1
 
Below is the utilities screen for my Canon Printer:
 
Canon Ptr maintenance
 
Then carry out a test print to verify if any of the print head nozzles are blocked:
 
Epson Ptr maintenance 3
 
If the resulting print has gaps in it then you need to run the head cleaning tool:
 
 
Epson Ptr maintenance 4
 
then carry out a test to ensure that the problem has been fixed.  If necessary repeat the cleaning and testing, until you are happy.  Bear in mind though that during the test print and cleaning cycles ink is used so beware if you are low on ink.


Vertical lines are jagged

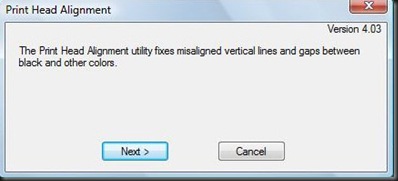
This is usually a sign that the print head is out of alignment. There’s not much you can do to avoid this problem - all print heads become misaligned over time.

You can usually recalibrate the heads using the alignment tool that comes in your printer’s utility section. This involves printing a pattern of lines on normal paper and choosing which pattern looks best.
 
Below is a screen grab of the Epson print head alignment tool.
 
Epson Ptr maintenance 5


Colours look dull and sometimes run into each other

Check that you have loaded photo quality paper into the printer. I know this sounds odd but sometimes the printer may not catch the piece of photographic paper properly and feed through another sheet below if the photographic paper is not loaded properly. Also if the photographic paper is put in the wrong way around (some photographic paper, especially thinner matt you will be printing on the back of the paper which is not prepared for printing on.

In this case it is simply a case of checking what paper the printer has used and if it's the right way round.


Colours are missing or prints lack shadows and contrast


Colours may print inconsistently even before your printer instructs you to replace a cartridge. If the ink cartridges are low on ink when the problem occurs, try replacing them, this may improve colour quality.

If there’s enough ink but your print seems to be missing a particular colour, you probably have a clogged nozzle, so you’ll need to clean your print head. Colour quality can also suffer if ink cartridges have been in the printer for more than six months. Try swapping in a new cartridge.


Vertical lines down the print, either on the front or on the back

This means that at some stage ink has got onto the guide or rollers of the printer.

This means a lengthy cleaning, I use cotton wool buds, to clean the guides and rollers where the ink is coming from. Feed through the printer old printouts afterwards to check the guides and rollers are clean before printing again. If the guides and rollers are clean and you have the problem again there could be a serious fault with the printer.


Odd looking text being printed out instead of your photograph

This is usually a sign that there is a problem with the printer driver, which translates what the computer is sending to the printer to what is printed out.
If you're experiencing problems visit your inkjet printer manufacturer's web site and download the most current printer driver. Once you have reinstalled your printer software you will need to reboot your computer and then try printing again.


Paper constantly jamming

This can mean that there is something is blocking the path of the paper through the printer.
 
Check inside the printer for anything like torn paper, staples, paper clips etc. If a piece of paper jams inside the printer carefully remove it checking for any missing areas of paper, if this does happen check inside the printer for the missing paper and remove this as quick as possible.


Multiple pages fed through at once

This can either mean that the paper is sticking together, often through static, or that the paper thickness setting is set too thick.
 
Check the paper thickness setting, if there is one on the printer, and set it correctly, and remove the paper from the printer, fan the paper (to separate it) and re-insert the paper into the printer.
 
 
Colours do not match what you see on the screen

This is usually a case of not using any form of colour management.

Basically it is a case of setting up your camera, monitor and printer to interpret colours in the same way, so that skin tones come out correctly, matching what you actually saw before you took the photograph.

This might sound odd, but, I have noticed a distinct difference when printing out the same photograph on my Epson printer and Canon printer.  The Epson seems colder, with a slight green cast, whereas the Canon produces a warmer tone.


No print out at all

Check the printer queue or status monitor, to see if the print has gone to the printer, if you have more than one printer make sure it has gone to the correct printer:

Epson prt que

often under the status heading a warning will appear if the printer is offline or out of paper or ink.


General Printer Care

Basically, it is a case of taking care of the printer,

  • watching ink levels (many now have utilities that warn you when the ink is getting low) both on the printer (flashing LEDs) and sometimes on the computer (a window opening up).
  • Make sure all connectors are in securely.
  • carefully remove paper from the printer, if you have to pull the paper out, which could damage the paper feed mechanism, check that there are no missing pieces, which could lead to paper jams.
  • only use good quality ink, poor quality ink will produce poor quality prints and may clog up the print heads
  • only move the printer when you have to, certainly not when it is printing.
  • Always keep plenty of ink, a spare cartridge of each if possible, because you never know you might run out of ink at a bad time, or late at night, trust me, I know !

Friday, 12 November 2010

Ezra Stoller

Ezra was born on 16th May 1915, in Chicago.

Whilst studying at the School of Architecture and Allied Arts at New York University, Ezra became interested in photography, in particular architectural photography.  During the course he began making lantern slides and photographs of architectural models, drawings and sculpture. After his graduation in 1939, he concentrated on photography.

During World War II, he taught photography at the Army Signal Corps Photo Center in New York City. Two decades later, Stoller founded Esto Photographics, the agency that has become one of the profession’s best known and most respected houses of photography, which is now run by Erica Stoller, his daughter.

In 1961, he was the first recipient of the AIA Gold Medal for Photography.

Having studied as an architect, it gave Stoller’s an architect’s eye and discipline that moved him to capture on film the structure and spirit, body and soul of the icons of Modern architecture, from the Louis Kahn’s Salk Institute in La Jolla to Eero Saarinen’s TWA terminal in New York and close to all of the great postwar buildings in between. Often, the image we carry in our mind’s eye of any particular great building was first seen through a lens by Ezra Stoller. He managed, in a career that spanned more than five decades, to capture not only the architecture, but also the times and culture embodied in each piece of work. His photos continue to be featured in countless books and magazine articles, and in art exhibitions worldwide.


 In 1990 Ezra's photographs were published in Modern Architecture: Photographs by Ezra Stoller, which features 400 of his most important works, along with his writing about the pictures, the buildings, and the architects who designed them

On 29th October 2004, Ezra passed away after complications following a stroke.


Examples of Ezra's photography:


Falling Water

Finnish Pavilion


Guggenheim

New Harmony


Seagrams Interior

Chamberlain Cottage


Kitt Peak


Notre-Dame-du-Haut Chapel


Manufacturer's Trust

Whitney Interior


Evaluation of Images


Ezra's photographs show good use of light, texture and shape.  With these images being in black and white the shadows are clearly defined with the texture and contrast of some photographs emphasised by the use of the black and white film.


The unusual shapes and forms in the Finnish Pavilion photograph, with the subtle lighting and the contrasts, not just in light but also with the inclusion of the plant in the bottom right of the photograph and the unusual shapes of the building.    

The shapes and forms are shown clearly, especially in the case of Kitt Peak, where the different tones which are lit by the natural light and the unusual angle of the shot with the almost diagonal line and the shadows created make this image very interesting.

With Seagam's Interior the contrast of the light from the windows and the shadows creating leading lines, leading the viewer into the photograph.   


Julius Shulman

Julius was a very well respected architectural photographer from America, who is best known for his photograph of Case Study House #22, which is shown below (row 1, column 1), who sadly died on 15th July 2009.
Julius was an architectural photographer who’s architectural photographs, like the iconic shots of Frank Lloyd Wright's or Pierre Koenig's remarkable structures, have been published countless times.
Julius was born on 10th October 1910, in Brooklyn, New York.  He was the son of Russian Jewish immigrants. His family soon moved to a farm in Connecticut. Shulman said that's where he learned about lights and shadows and developed a love of nature.

When Julius was 10, his family moved to Los Angeles and opened a dry goods store. His father died of tuberculosis in 1923, leaving his mother with their five children and the business.

Julius attended Roosevelt High School, where he took his lone photography class. He spent the next several years soul searching and earning his rent money by taking photos with an Eastman box camera. One picture of a bridge won first place in a national magazine contest.
It was a casual meeting with architect Richard Neutra in 1936 that launched Julius’s career in architectural photography.

The brilliant design and style of buildings like those by Charles Eames, and Richard Neutra, was first brought to peoples attention by Julius's photography. The detail in the photographs of his work demanded that architectural photography had to be considered as an independent art form. Each of Julius’s architectural photographs brings together the perception and understanding for the buildings and their place in the landscape. The precise compositions reveal not just the architectural ideas behind a building's surface, but also the visions and hopes of an entire age. A sense of humanity is always present in his work, even when the human figure is absent from the actual photographs.
Today, a great many of the buildings documented by Julius have disappeared or been crudely converted, which is why I wanted to capture photographs of some of the buildings in Burton On Trent, before some of them suffer the same fate.

Julius’s mission was to use his photography to build the reputation of architects who were bringing innovative design to the West.


Examples of Julius’s work


wg051503_3, 5/17/03, 11:29 AM, 16C, 2664x2094 (78+1015), 50%, Repro 2.2 v2,  1/25 s, R64.8, G56.5, B92.0julius-shulman-chemosphere
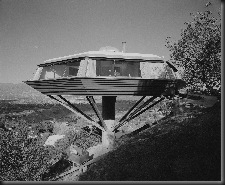
Case Study House #22Chemosphere
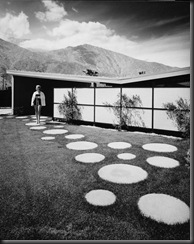
Fire_Station_No._28,_644_South_Figueroa_Street,_Los_Angeles_(Los_Angeles_County,_California)Palm Springs House
Fire Station No 28Palm Springs House
prairie-chicken-house2Annenberg Space for Photography
Prairie Chicken HouseJuergen Noga
artwork_images_901_168161_julius-shulmanFreeman House_julius-shulman
Freeman House


Evaluation of Images


Julius's photographs include some colour photographs as well as black and white photographs.